A Pond for Aston (part I)
"Fake" water is an entirely new area of model railroading for me. Canada is full of lakes and rivers and a layout without some kind of water is like a hockey player who doesn't have a nickname ending in "ie" or "y".
So fake water was a last task I set for myself. The water itself is a one or two-part epoxy that dries into a clear, hard surface. You can model a wavey lake, a rippley river or a sedate pond. The first two are challenging and the last was more or less what I wanted (Aston Lake though can get quite wavey).
I purchased a one-part epoxy and some dye. Ponds in Ontario are rarely clear - on fishing videos, water colour is described as "tea-stained". That was the effect I wanted.
First, let's look at the space (photo taken in June 2022!):
I took out the pink foam to the plywood to have a level surface. This meant, however, that I had a 2 inches of depth - too deep for the fake water. To build up the bottom, I used styrene strips (the orange is glue for the foam board bottom that was to be installed.
Testing
According to the literature, the keys for a successful water effect are:
1. A perfectly level surface.
2. Thin pours (i.e. at most an 1/8 inch at a time).
3. Ensuring the epoxy penetrates through scenic objects (I'll illustrate this later).
4. Attention to bubbles during the setting stage.
5. Watching out for shrinkage.
There was another key, which I was to discover later to my chagrin.
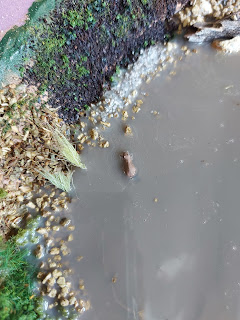
That's a lot to keep track of. That meant a practice run. I took some spare MDF and foam and built a sample pond. I experimented with various kinds of scenery to see how the "water" settled in (from here on in I'll stop using the quotes - water = epoxy). I also added a visitor, imported from Austria, that we will discuss in a further installment.
These pictures were taken before the water cured into a clear state. They illustrate some of the challenges - bubbles that needed to be popped (hence the lighter), the need to work the epoxy over and behind rocks and the tall grass) and getting the colour right - tea stained but not sludgy.
The testing was done over the August 1 weekend - showing the slow pace of this project.
Bottoming out the Pond
But let me go back to mid-June, when I put the bottom in the pond:
I was paranoid about how the epoxy would react to the foam board bottom so I covered it in flex paste.
Preview to Part II
After the August 1 test run, I painted the pond bottom and added scenery - the water would come last. I didn't take pictures of the pond bottom before I added scenery, so here is a glimpse, pre-pour:


No comments:
Post a Comment