Adding a road to the Blob
One of the most amusing (or interesting) aspects of the "train hobby" is the number of disciplines and skills it can encompass. In building the basic layout, some knowledge of carpentry and electrical work is necessary. Track laying requires patience, a good saw and the ability to transfer measurements from a drawing to real life.
Aside from technical skills, the blob involved another skill - scene composition. Basic model railroad scenery theory states that the trains/track should fade/blend into the scenery. And in real life, trains are rarely the focus. So other things are just as important. Like roads.
 |
| The road |
The geography of the road is that it links the (unseen) town of Aston with the station and Aston Growers.
A basic rule of model train scene composition is to avoid having major scenic elements be either perpendicular or 90 degrees to the layout edge (either the front or the back). You want angles.
Another concept is to not draw attention to places where you "cheat" to fool the eye.
Finally, scenery should make sense - that is, if there is a bend in a road, you should include the thing that is the reason for the bend (a rock, a river, etc.).
Enough road/scenery theory.
To build the road, I first glued cardboard to the insulation foam to give myself a guide for the width of the road. I then cut small pieces of balsa wood to form the edges of the road. Then, I poured Woodland scenics "Smooth-it" plaster into the balsa wood form, smoothing the top with a crepe maker tool. The balsa wood acts as a guide for the crepe maker, ensuring the plaster is level. Still, there are inevitable dips and bumps and lots of sanding and some repaving is required.
I painted the plaster with "asphalt" paint and then used weathering chalks to tone down the paint. I didn't paint lines on the road because I didn't want to draw attention to the fact the road's width is not uniform. My theory is that this is not a major thoroughfare. I added some medium rock ballast on the side of the road and some posts (painted wood skewers) to keep motorists on the road.
The posts took forever to make (there about 30 of them - chop, paint, paint again, drill, insert). But the details make the difference.
I feel like a dirt shoulder would have been better for the road. Over time, I've come to the gravel as too clean/white - such that it draws attention.
Road elements
What makes the road interesting?
1. The bridge.
 |
| The footing/base for the bridge can be seen. |
 |
| Ready for installation. |
 |
| In situ. |
The bridge (a Rix products kit) was easy to assemble. The railings reminded me of the bridges in Glen Williams, where I grew up. I rusted the railings with burnt sienna paint and added (too much) grime on the surface.
As with many things on the layout, the challenge with the bridge is that it had to fit in with future projects - in this case, scenery blob #1 (the large blob at the back against the backdrop) and scenery blob #2 (in the foreground in the first picture). Here the pink insulation foam helped because you can make a precise cut in the foam for the bridge to fit in.
I measured the fit countless time - both to bridge the blobs together and to ensure the clearance over the track was adequate.
 |
| Blob #2. |
2. The curve.
The almost 90 degree curve vehicles encounter isn't very prototypical. In the 60's, with standard tractor trailer lengths being 28' to 34' (feet), I could see it being possible.
But here again, the art of distraction comes into play:
 |
| Hi visibility railings added by Aston county |
 |
| Hiding the road. |
I scratchbuild slightly over size warning railings to draw the eye and serve as an apology from the Aston county public works department for the sharp curve.
Here again the 3-D backdrop helps - the rock outcropping justifies the sharp curve.
3. The billboard.
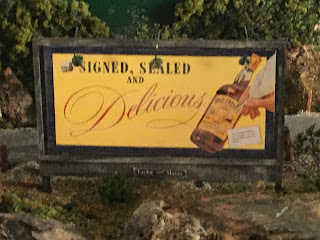
1. I'm a lawyer - signed, sealed and delivered being a common (albeit archaic) phrase used in contracts.
2. I kept on humming the Dave Dudley tune "Six Days on the Road" in my head as I built the billboard.
3. I work in the transport business (and for a trucking company in the past) so I thought this would be an ad that appealed to that demographic. Bottles of scotch being a very common "thank you for your business" present to traffic managers back in the day.
The billboard is an easy-to-assemble kit (it took about 2-3 hours) from Blair Line. I painted and weathered it before installing it. The billboard illustrates many of the things that make the hobby rewarding. First of all, the MR industry has plenty of small Mom and Pop suppliers who make great kits just a click away. Second, the effort/reward here is considerable - the billboard adds a lot of visual interest and it only took a short time to build. And I like the colour (muted yellow) as it goes well with the warning railings. Three, the billboard, in a small way, takes you out of 2021 Toronto as you look at it, back to the 50's and 60's.
4. The disappearing act.
As I mentioned at the top, a golden rule of scenery is to avoid 90 degree meets between foreground scenery (i.e. a road) and the backdrop. Of the oldest tricks in the MR book (literally - I saw this in a scenery book from the 1950's) is to have the road crest right before it hits the backdrop so the eye can't see the meet. The dip also avoided the problem having the road plaster mess up my picture backdrop. The road actually stops about 1/8 away from the backdrop.
Narrowing the road also gives the illusion of distance.
And I added a curve.
If I really wanted to be cool, I would have added N-scale guardrails (a smaller MR gauge than HO) to create "forced" perspective - that is changing size to fool the eye into believing something is further away than it actually is.
 |
| The finished scene. |
 |
| The narrowing is very apparent. |
In a future installment, we'll see where the road comes out. But next, I think we'll take a brief side trip.


