Monday, June 20, 2022

 Yet another post on Nowhere Road

(Still nowhere near completion)

For a month, the road sat in limbo. The glue dried, leaving a sort of perpetually damp sheen on the road. Not what I was looking for.

Before I could fix the look of the road, I worked on the scenery around the road, figuring the first step was to blend the road into the scenery.


The truck is store bought

I added an abandoned truck off a road fork and took the opportunity to weed up the scenery. [A friend of mine described her birthday dinner at a French restaurant as "Fat Forward". I've begun to think of scenery as "Weed Forward"].

Here come the weeds

I've always loved model railroading weeds. I think its because the Canadian suburbs are so orderly yet the scenery around train tracks is always the opposite.

My standard weed approach is base scenery first. Then random patches of grass followed by a few bushes.

I added black ballast around the switches since train crews would spend time there, restricting weed growth.


Look at that crisp track! Finally perfect ballast.


Placing weeds can be slow because of the layers approach and waiting for glue to dry after each step. But the crazy sounding thing is that I feel the slow pace helps one bond with said weed bed, thinking through the individual placement of grass, bushes, ground cover and other scenery. It sounds silly but it is true.

And with scenery added, the road did begin to look better. And I wasn't even done even though time had moved into March.

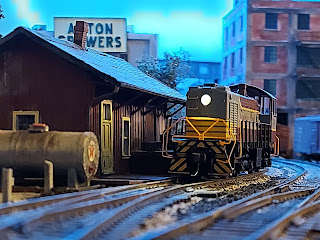
I'll close this post with a modified photo (a RS-18 switching a slab sided hopper) showing the subtle effect of the foreground grass:


Aw hell, here's a second one:


Here's a before from December 2021:


As June, Nowhere Road has reached 1/2 completion. The main part of the road is complete but I need to fill in the other side.


...And that is a long story. Next post will be a hodge-podge the begins the next part of the story.


Saturday, June 4, 2022

A Touch of Stocking

The next phase of Nowhere Road's construction was the following series of text messages sent in late December (just before the lockdown):

Andrew: Hey there. Just confirming dinner tonight at 730.

Clare: Yes, we're confirmed. Looking forward to it.

Andrew: Umm, would you mind bringing an extra pair of stockings?

Clare: Either you're taking up bank robbing or have a burlesque career you've never told me about. But okay.

Andrew: Thanks.

Clare: So what do you need them for so I pick the right pair?

Andrew: Train scenery.

Clare: I should have known.


Nowhere Road looks like a melted chocolate bar here, not a road.

And this is where the dirt comes in. And the stocking.


Placed over a spray can cap, the stocking filtered my dirt into a lighter, less pebbly grade of dirt.


It is hard to tell from these photos, taken while the dirt was still glue saturated, but the stocking cap method did provide the desired fine layer of dirt.

And then I added some gravel to suggest that the road was maintained at some point.


I was pretty grouchy about the way the road looked at this stage. The gravel wasn't evenly applied. The cork base made the road stick out above the base scenery. And so on.

To lift my spirits I finished the scenery around the loading shed for Generic Canneries and left everything for another month.


Model railroading is one of the few times that seeing a (simulated) weed patch brings happiness. Yet another piece of base scenery covered.

Tuesday, May 24, 2022

Nowhere Road...

The last major accomplishment I detailed was the addition of a lighting valence.

Which left the layout looking like this:

Layout circa November 2021


To fill the foreground space, I planned a poorly maintained dirt road leading to the (under construction) clubhouse at the top of Outhouse Hill.


I had no idea how to make a good looking dirt road. You'd think it is simple - glue real dirt onto scenery. But like everything else, dirt comes in various shades and well, you know, I want a certain mise en scene.

So like everyone else, I watched YouTube videos and came up with my plan.

First, road bed cork - the kind used for track (I'll explain the new gully later).


...and glued it down while pinning it in place.


Then, real-mise en scene like, I used an exacto knife to cut divots in the cork to simulate ruts and low points.


Then I added some Flex Paste (sort of pre-mixed plaster) to give additional texture to the road and the surrounding scenery.

And painted, eliminating the last of the bare pink on the layout (excluding the new gully).


The road, at this point, is hardly anything to write home about...but wait!


Sunday, February 6, 2022

 This and That...

The train hobby is a hobby that can sit for a while. Aside from low-level maintenance (mainly track cleaning), the layout can sit for weeks on end, untouched, without any kind of impact.

The hobby has many different aspects - scenery, rolling stock, details, scene setting (such as the valence) - and running trains, of course.

With the valence in place, I enjoyed taking photos of my trains in the new light.


...and

This is a favourite shot


I also worked on other projects.

Weathering

Shiny boxcars and cabooses received grime and new couplers.


Box car and Caboose...


Reviving an S-3

My main power on the layout has been an Atlas S-2. But I've had an Alco S-3 (from Life-Like) sitting in the cupboard for a few years. I had a sound and DCC (Digital Command Control) decoder installed in it a few years ago, but the dang thing never seemed to work.

The S-3 is a less powerful version of the S-2 (660 HP vs 1000 HP) the CPR used in its secondary terminals. The engine is a good fit for the short trains of the Aston Spur. The main spotting difference between the S-3 and the S-2 is the different trucks.

After reading a Model Railroader article, I reset the settings and the S-3 came to life. I changed out the couplers and it is now an active member of the fleet.

While it needs weathering, it is a good looking locomotive.

Note the trucks

A few details

When my friends come over and see the layout, it is the details that they tend to enjoy - aside from the gorgeous growling sounds my diesels make.

So the boys at the Aston road crew have started added some road signs as appropriate. More signs to come.


And, in my next post, I'll cover a late November train trip.


Thursday, November 25, 2021

Valence

A valence is used to hide/block/conceal under cabinet lights.

When I used the MDF board to build the backdrop, I had some left over. I knew that I would want some overhead lighting for the layout due to the room not being overly bright. I needed lighting if I wanted to take photos of the layout. I also felt the backdrop looked awkward without a top, or at least a partial top.

The installation of Aston Growers and Generic Canneries made the need even clearer.


Darkness on the edge of town.

I had all this great modelling behind both buildings that was hidden due to a lack of light. I could position a lamp for photos but it was not an everyday solution.

Looking nice but unfinished.


Valence basics


*For the top, I would use the leftover MDF (NTAO = never throw anything out).

*For a bit of trim, I would use some of the left over barn board I bought for $20 (NTAO).

*For the lighting, I would use the same sort of Ikea lights I used for my Canadian display case (see my February 15, 2021 post).

The idea was that the top/valence would cover the back 1/3 of the layout, giving some overhead light to the AG/GC scene, which, let's face it, is the star of the layout because it is where rolling stock rests.

When you read this post, keep in mind that I had pictured the valence as a major project and had thought about it since starting the Aston Spur in 2018 (OMG - 2018!!! It has been that long! Just for a 2x7 layout!).

But as you read this, I'm sure you're struck but how simple the whole thing is. No probs, eh? I figured the Labour Day weekend would give me enough time to complete the project.

The MDF

In late August, I drove over to see my Uncle Jim and his razor saw. It was a hot, sticky day, but with UJ's help, we cut the MDF into a triangle. We cut a small rectangular piece to bolster one of the backdrop sides.

Which I painted with the same blue I used for the backdrop...

...but the blue paint had lost its chemical goodness since 2019 so I had to get more from Home Depot. Okay, so maybe this wasn't going to get done on Labour Day.


I also kept and painted a small triangular bit of MDF to create a space for the wires without opening the valence too much.

The crazy thing is that the preparation and clean up took far longer than the actual painting. As you can see, I was damned if I was going to brush the paint onto the MDF - only a roller would do!


Lighting

As I did with my Canadian display, I bought string lights from Ikea. A single strand of LED lights connected to a transformer.


The result was like drinking watery ginger ale when I tested the effect by stringing the string over the layout.


Now that I look at the photos, it doesn't seem that bad, but in person, the light seemed anemic.

Back to the drawing board (or rather world of e-commerce).

Round #2 of lighting came in the form of three strips from Home Depot. The lights came with a remote (what doesn't these days?) to adjust colour, intensity, strobe (!?), etc.


I put aluminum foil under the lights to defuse some of the heat. They are mounted to the MDF using small screws.

And as the above photo shows, I added barn board to create the valence:


The barn board wasn't as satisfying as it should have been - I think the entire upper part of the layout would have benefited from barn board trim. But I didn't have the patience to cut smaller pieces of board to fit. At least it was a mindful compromise.

The wires come up through the gap (remember the small triangle I spoke of) to the junction box:


The junction box itself is screwed to one of the studs I added to support the valence.


The valence is screwed to the top of the layout in case I ever need to remove it (seems unlikely but you never know). I didn't take many photos of attaching the valence to the frame but, man, am I ever glad I put in some back studs to keep the backdrop (relatively) straight. And to think the backdrop was one of my first layout projects.

It just reminds me how important thinking ahead is.

The Reward

I'll share more photos in a later post but for now...:


Contrast with the harsh, pre-valence lights:


Sunday, October 31, 2021

 Parking lot for Generic Canneries - Part II

This is my second post about building a parking lot. Lest anyone think I am exceptional[ly dull] in this regard, let me direct your attention to:


Conrail's Onondaga Cutoff - making a highway bridge: 


Back to it...


Another overall view:


Left by itself, the parking lot would dominate the scene - the concrete colour and the size of the parking lot make it stand out.

Any parking lot located in tight confines needs some good guard rails:

Note the weathered hopper :)

The guardrails consisted of a bamboo skewer cut into lengths, painted grey and pushed into the pinkfoam board.

The "rails" are strip left over from another project - they were already painted grey.

Never throw anything out


Affirming one of the golden rules of model railroading:

"Never throw anything out". BTW, rule #2 is:

"Everything has a use depending on how imaginative you are"


Filling in the details


Two things to notice at this point:

1. The small gap in the fencing, awaiting the construction/arrival of a detail; and
2. The scenery is still at the base or flat stage without much texture.

The shack/shed was a fit for the space, so I was ready to add the next layer of scenery - shrubs and junk.


But first I went back to the parking lot and added a water spigot to hose down truck trailers and then added the missing fencing:


And added some hazard signs for the building corner to help trucks driving at night. These signs were left over from the bridge scene I posted about many months ago (again, never throw anything out!).


With everything in place, the scene looked like this:


I added a picnic table for the workers (behind the shed) as a last touch.

And then toned down the whole scene with pastels...


I decided to keep the parking lot relatively clean because it is a new parking lot, but everything else got some grime.

The above photo indirectly highlights the next (and last) project for the layout. A lighting valence.

The scene is all paint by numbers work. It helped to have the shed pre-built (an early Covid project) and to have ready-made junk sitting around. I'd really love to have some truck trailers sitting in the lot and maybe that is a winter project.