Sunday, March 7, 2021

 Ballast and Track

To my mind, the single most important (and often under-remarked) aspect of a realistic model railroad is accurate track and ballast.

Track


To begin with, real life track is measured in pounds per yard (I believe). Main line, top-notch, heavy use track is 132 lbs. The lowly industrial spur is often laid with 80 and 90 lb. rail. 

Model track comes in codes. Code 100, the old standard, comes out to 156 lbs. per yard - well over size. Code 83 hits the real-life standard at 132 lbs. You can buy Code 70 (100 pounds) and Code 55 (80?) but it makes things tricky.

In real life, rail car wheels stay on the track because of the weight of the rail car. Wheel flanges (the edge of the wheel) are small because they just aren't that important. Model rail cars are light and can't depend on their weight to stay on the track. As a result, model flanges are larger than life.

This is where the problem with Code 70 and Code 55 comes into play - the flanges of most model cars are too big. So unless, you want to go to the extra effort of replacing wheels, your best bet (compromise) is Code 83.

But that means you need to camouflage the out-sized rail. Which requires paint and ballast.

Unpainted track

So once I laid track for the Spur and made sure it was where it needed to be, the next step was a visit from Mr. Camouflage Brown.

Already better

Spray painting track, while worth it, is a bother. You need to ensure the paint doesn't get on certain parts of your switches. You also need to keep it away from the pink foam because the paint will eat the foam.

Some modellers vary the paint to reflect the usage of the rail. Well-used rail is often a blackish-brown colour. Lowly siding rail is often rust coloured. I decided to keep things simple and paint everything a uniform brown. If I was an air-brushing pro, I might have varied colours but one goal of the layout was to keep things simple.

I almost forgot to mention the roadbed. In the real world, drainage is an important part of keeping track in place. So most track, outside of a yard, is elevated. In model railroading, this is where foam and cork roadbed comes in. Using roadbed also deadens the somewhat unprototypical sound of model railcars. In the real world, cars clunk. Model rail cars tend to click due to their lightweight.

Putting roadbed under your track can be time consuming. You want the track to be centered on the roadbed. You also want to avoid gaps in the middle of the roadbed (which comes in two pieces) otherwise you'll have gaps in your ballast.

To get a satisfying end result, I spent a lot of time cutting and fitting small bits to cover the gaps.

Tidy roadbed = tidy track

Finally, as part of creating good looking track, you need to add ties to the spots where you cut away to insert rail joiners (see the gaps in the picture above).

For extra nerd points, some modellers handpaint ties in different shades to replicate the varied weathering of real life ties.

The horror of Ballast

The second part of realistic track is modelling ballast. The concept of ballast (in real life) is simple - it ensures good drainage and ballast "locks in" the track so that it stays in place. 

Ballasting track is both maddening and satisfying. Real life ballast is endlessly variable. Railroads generally use ballast that is local to reduce transportation costs. Ballast, over time, gets mixed with weeds, dirt and crap. It gets dirty. It washes away and needs to be replaced. Sometimes the track rises above ballast and sometimes the track is set in the mud.

Here we have two pictures, taken by my Grandfather, at the same location (Forks of the Credit):


In the first picture, the ballast is grey. In the second (partly due to the light), the ballast is black.

In the pictures above, the track is set in the ballast so that you can't see the sides of the ties. I've seen other pictures of track where the ballast is below the ties.

Just to remind you how boring I am, I will say that I am always drawn to ballast in photos. To me, ballast and track is the story of the line. Razor sharp (neat) ballast means either labour was cheap or heavy traffic rode the line. I have a picture of a train riding the 4-track highway around Sunnyside in Toronto, on track where the ballast looks thin and muddy. It is surprising to see track in that state given the importance of the line. Decay is interesting, and given the capital intensive nature of the railway business, every day the railway has to decide between spending money on upkeep or letting matters slip a little further.

Not surprisingly then, there is a host of model railroad articles written about ballasting your track. The basic method is: 1. spread ballast out of a paper cup until it is perfect. 2. "Wet" the ballast to hold it in place. 3. Dribble a water/glue mixture on the ballast. 4. Watch in horror as the water/glue mixture moves the ballast around and makes a mess. 5. Swear and try to find a better method of laying ballast.

On the layout


Rants aside, I went with a two-part ballast structure for my track. Black "slag" ballast for the sub-roadbed and white/grey "rock" ballast for the top. I wanted the effect of track that was once well-maintained now slowly becoming neglected. To emphasize the effect, I weathered the ballast with grimy grey and earth brown powder.

The first ballast test.

I still haven't found a swear-proof method of laying ballast. From what I've read, the key is to use (I'm not kidding) actually crushed rock because it doesn't move around as much when you apply glue. To be tried at a later date.

Weathered vs. not weathered ballast

I've tried to present a few contrasts on the layout. The grey/white ballast is for the regular section of the line. The spur into Aston Growers has sooty ballast and dirty ties - showing its less than important status. The two track spur to Generic Canneries, has new, fresh ballast, showing it is a recent addition to the line (Generic Canneries having upgraded its facilities to receive sugar and corn syrup in bulk).

Grimy

Fresh

My favourite spot though is largely unseen. The most picturesque track is track barely keeping away nature - two rails, barely seen, overgrown and in danger of fading into the dirt.

In real life, I saw this at a park in German, where a small train ran through tracks laid in the grass. Incidentally, this ride is one of my favourite train trips, even though it only lasted about 15 minutes.


On the layout, the track behind Generic Canneries is my attempt at this:

A study in contrasts

The last picture is a good way to end this post - three tracks, side-by-side, each with its own story to tell.


Sunday, February 28, 2021

Meet me at the station

Even though the Aston Spur is a "spur" and not a candidate for passenger service, I wanted to have a station as the centrepiece for the layout.

And with the station would be support buildings for the local track gang to store supplies and play cards in when it rained. I've always had a fondness for scenery around stations stemming from my days growing up in Georgetown, when we'd visit "the yard" on the way back from my Dad's hospital errands.

After I built my display case for the Canadian, the next hobby re-entry point was to build structures. Kanamodel offered wood kits of many CPR prototypes at a reasonable price. At this point, I hadn't thought of building an actual layout, but the idea of building structures for future layout appealed to me.

Support structures


So...

Coal shed
"Speeder" shed

Oil shed (not appearing on the layout)


The pictures don't tell the story of how long it took to build these basic structures. While the Kanamodel kits are fairly simple, you still have to measure and cut little bits of wood and assemble them piece by piece. For example, the trim on the door to the Speeder shed. The lattice for the Oil shed dock (which I don't have room for on the layout) was also time consuming. The doors and windows also prove finicky since they needed to be painted and fitted to openings in the wood. The most shockingly difficult part of all was building some stairs using a plastic form. The form was warped and I was never able to get a satisfactory result.

I was careful to paint the structures in standard CPR colours to give them a family look. In retrospect, the grey colour made the doors and windows pop more than I wanted. I should have painted them brown. The CPR's "red" also varied - most structures have a more brownish red vs the candy apple or barn red I bought at the craft store.

I also built a freight platform with a canopy roof that sits in a closet waiting to be placed on a future layout.

Even though I made many mistakes the structures came out fairly well. Along the way I built the skills needed for the big project - Aston station.

The Station

Aston station front

Aston station back

Aston station is a Kanamodel kit based on the CPR's Meadowvale station which was located on the Streetsville/Orangeville branch line. For many years, I worked a few miles away from where the station must have been located before the era of suburbs and large featureless warehouses made it redundant.

I labelled the station my "Zen project" since it coincided with a stressful period in my life during which I had taken a sabbatical to recharge mid-career. Working on the project during the spring/summer of 2018 was diverting.

Some of the challenges in building the station were dealing with a warped base (made from resin) and shingling the roof. The roof shingles were challenging because they came in long strips that I needed to keep parallel with the roof edge. They also had a tendency to come unglued, so plenty of swearing resulted.

As I've mentioned previously, I've developed a great deal of fondness for the cottage industry that supplies model kits. Meadowvale station cost me about $60 - a very reasonable price for a complete kit. When I had a question along the way, I e-mailed the owner of the company and he responded within a day. And, as you may have gathered, I like the idea that my CPR layout has prototype CPR stuff on it. Without Kanamodel and other companies like it, my dreams wouldn't be possible.

Again, I made the mistake of painting the windows and doors grey.

Putting it all together

Two RS-18s in front of the station.

Once I test fit the structures, I weathered them with powdered chalk (with lots of white streaks for pigeon poo on the station roof). They are kept in place by wood forms. I built a curb around the station for this purpose.

One of the maxims of structure placement is that each structure should have room to breathe. In the real world, structures, especially small structures, are spaced apart, not crowded together. Moreover, you should leave room for your 1/87 scale people to access the structures, and 1/87 scale people are quite messy so leave room for lots of junk. A structure without junk around it looks as awkward as a sheepdog that has just had a close shave.

The station area is in front of my background blob. A retaining wall keeps the hill in place, providing room for a road that accesses the station and surrounding buildings. There is a small parking lot, made from smooth-it plaster on top of fibreboard. Off the parking lot is an overgrown cinder path for the crew to park their work vehicle (what self-respecting work crew parks in the parking lot?) while they access the coal shed and speeder shed. 

I bought an oil tank to store fuel for the speeder that lives in the shed and CPR work vehicles, and, ignoring the warnings of the insurance company, placed it next to the station. I loved building the oil tank - it was a lesson in how paint and weathering can make plastic shine (in the right way).

I added oil barrels, broken pallets and a scratchbuilt ballast bunker to give the structures more of a habitat. I boarded off a door to the coal shed figuring the structure wasn't in its happiest of days. And added lots of vegetation (including a shrub growing in the ballast bunker) to show that the Spur gets only the bare minimum of attention.


There is one very important detail missing from the scene - once I have access to a good printer again, I'll create an "Aston" sign for the station. That, in of itself, is a bit of a process because it involves figuring out the font the CPR used for station signs on Eastern Ontario.

I also have plans to add a mini-scene to the north end of the parking lot - probably a truck getting a replacement tire. But that will require more research. 


Sunday, February 21, 2021

 Old and New

Evolution

I don't have many photos of the layout my father and I built when I was growing up. It was a large oval (about 20 x 20) with a centre blob containing a yard. There was a branchline and a second short branchline into the basement bedroom. We completed about 25% of the scenery but laid most of the track.

The track was Peco Code 100 and the Power was DC with power blocks. My father was very adept at electrical work so we had switch machines for most of the turnouts.

The rolling stock mostly Athearn - some kits and engines from the 1960's and some rolling stock I bought in the '90s. Some of the rolling stock such as Accurail boxcars still see service on the Aston Spur.

Anyway, this post is really just an excuse to post old photos.

Scenery

Trees and rocks

Base scenery on the old layout was window screen covered with plaster cloth (thank you GDH) and wallboard compound to smooth it out. I'd paint the plaster and apply ground foam on top.

Trees were dried goldenrod, spray bombed with green paint, with foam added and hair spray to seal.

Background "puffs" were either pillow case material spray painted or dyed lichen bought at the hobby shop.

A Budd Car headed down the branch

Rocks and cliffs were just plaster cloth/joint compound painted grey.

Rocks in the background

Everything has got better since the 90's. Some of the scenery basics remain (ground foam, puff ball background trees, plaster/wallboard compound). But:

1. "Super Trees" have become the standard for trees providing finer detail than goldenrod. Although the foliage method is the same (spraybomb, cover with foam and then spray paint).


2. Rock molds (which existed in the 1990s but I didn't use them) coloured with paint are far better than my old method. In my mind, the paint is much better now since acrylics are cleaner and easier to dilute than solvent based paints.

3. The insulation foam method for building a scenery base allows for more control over gradients than the plaster cloth/screen method. Moreover, it is much easier to incorporate rock molds into insulation foam because you just cut into the foam. I'm not sure how I would do it with the screen/plaster method.

4. While ground foam has improved, the real revelation is with grass. 


The above photo is not from my layout but it shows how fine grass detail has become. You can now simulate varying lengths of grass (i.e. wild grass vs a well-kept lawn) very easily using different grass mats.

5. Finally, although not scenery per se, artist chalks/powder have replaced paint as the go-to weathering medium. While I like paint for giving on overall effect (i.e. using a black wash to draw out rock detail), chalks and powder allow for more variation - and if you use too much, you can blot away with water and start again.

Rolling Stock

The Tenshodo F9's

Atlas S-4 (the boxcar on the right is seen below).

The best piece of equipment on my old layout was a brass F9A and F9B unit made by Tenshodo - a Japanese company. The engines are beautiful (I still have them) and ran well, although only the A unit was powered. There weren't accurate CPR units - there is a difference between a F9A (not owned by the CPR) and a FP9A (owned by the CPR) The Atlas S-4 wasn't as pretty, but could crawl along the layout at low speed.

The engines were also DC-powered. With a DC power system, only one engine at a time could run in a wired block, unless you ran them together in a consist (far from fail safe). No sound either.

With DCC, sound-equipped locos, the difference is stark.

                                                Rumble Rumble.

In terms of old rolling stock, it ranges from the generic...

Repainted Athearn Box


Accurail wooden boxcars.

...too pretty good actually.

I'll save a full descripton of the Aston Spur's rolling stock for a future post, but as with scenery, the options have improved significantly. CPR specific rolling stock is now available (at least on E-bay) which is a big morale booster.

Before I leave this post, the best picture I have from the old layout:


Monday, February 15, 2021

The Canadian 

How I got back into the hobby...

I had a model train layout when I was a kid.

I had a model train layout when I was in law school.

Through the years I kept my subscription to Model Railroader and Trains and stayed interested in the hobby.

One of the moments that hooked me on the hobby was seeing old pictures of the CPR's Canadian passenger train from the '50s. The Canadian is most famous for its dome cars designed to maximize scenery viewing. I rode Via's version of the Canadian several times (last in 2016) and it is one of those things in life that NEVER disappoints. How many things in life are as good today as they were 60 years ago?

Robert J. Sandusky photo.

But owning an HO scale model of the train, or should I say, an accurate model of the train seemed like an impossible dream. A sidebar here - in the glory days of passenger trains, railroads would often order custom equipment. It isn't like today, where an Air Canada A330 looks pretty much like every other A330 except for the paint. The Canadian cars were unique (and, at $40 million in 1955 dollars, a terrible investment considering the downward spiral passenger trains had entered). 

Shoreham Shops offered the train in Brass in the early '90s, but at $300 per car (for a 10 car train) and no prototype F units, that didn't bring the dream any closer.

...and then, in 2008, a Company called Rapido Trains - Rapido trains - announced that they would be offering a 10-car set, with prototype FP9A and F9B units for a decent price. Talking about Rapido is a whole other post in of itself. The company, which grew from very humble beginnings, has endlessly delighted Canadian model railroaders for years by introducing Canadian prototypes that modellers never dreamed of seeing (in plastic, at least). Steam engines. Rolling Stock. Special trains (the Tempo, the LRC). Diesel engines (my RS-18 fleet, FPA-2's, F units, etc. etc. etc.). All highly detailed (they actually put a toilet in one of their models - clarifying that it was non-operable). There is now a company that makes it possible to accurately model your favourite Canadian railroad during the time and place you wish. And they are genuine and fun (their YouTube product videos are worth a watch - for example, Display case.)

I placed my order. And waited. And waited. And waited so more. And then, one day in 2011, my set arrived. It was perfect.

A Chateau series sleeper.

Deluxe Coach


Only one problem. To display, even part of the set, would require 8 feet of wall space and I'd have to find display case to keep off dust.

This required some serious thinkin' because I'd have to create a display case from scratch.

I started with Ikea photo shelves. I added some track. There was no way I was going to leave the track bare, so I ballasted it and put it on foam roadbed. That meant trips to the hobby store.


I added Ikea strip lights.


Skyline Dome car

That wasn't good enough, so I added a blue foamboard backdrop (not perfect but it still works) because the peach coloured walls weren't doing it for me. To keep the dust off, I had clear acrylic side panels custom made and attached them to the Ikea shelves with velcro. They have never come off, and the train remains in its tomb. I do have two spare cars and a spare F unit in storage.

F-units


Pocket Streamliner on the layout.

Park Observation car.


Needless to say, the entire project (which took months) was extremely satisfying. I loved the problem solving. I loved the look of the track. I loved the visuals in my brain of what a perfect diorama would look like.

Which led to...the Aston Spur. 

Sunday, February 7, 2021

 Adding a road to the Blob

One of the most amusing (or interesting) aspects of the "train hobby" is the number of disciplines and skills it can encompass. In building the basic layout, some knowledge of carpentry and electrical work is necessary. Track laying requires patience, a good saw and the ability to transfer measurements from a drawing to real life.

Aside from technical skills, the blob involved another skill - scene composition. Basic model railroad scenery theory states that the trains/track should fade/blend into the scenery. And in real life, trains are rarely the focus. So other things are just as important. Like roads.

The road

The geography of the road is that it links the (unseen) town of Aston with the station and Aston Growers. 

A basic rule of model train scene composition is to avoid having major scenic elements be either perpendicular or 90 degrees to the layout edge (either the front or the back). You want angles. 

Another concept is to not draw attention to places where you "cheat" to fool the eye. 

Finally, scenery should make sense - that is, if there is a bend in a road, you should include the thing that is the reason for the bend (a rock, a river, etc.).

Enough road/scenery theory.

To build the road, I first glued cardboard to the insulation foam to give myself a guide for the width of the road. I then cut small pieces of balsa wood to form the edges of the road. Then, I poured Woodland scenics "Smooth-it" plaster into the balsa wood form, smoothing the top with a crepe maker tool. The balsa wood acts as a guide for the crepe maker, ensuring the plaster is level. Still, there are inevitable dips and bumps and lots of sanding and some repaving is required.

I painted the plaster with "asphalt" paint and then used weathering chalks to tone down the paint. I didn't paint lines on the road because I didn't want to draw attention to the fact the road's width is not uniform. My theory is that this is not a major thoroughfare. I added some medium rock ballast on the side of the road and some posts (painted wood skewers) to keep motorists on the road. 

The posts took forever to make (there about 30 of them - chop, paint, paint again, drill, insert). But the details make the difference.

I feel like a dirt shoulder would have been better for the road. Over time, I've come to the gravel as too clean/white - such that it draws attention.

Road elements

What makes the road interesting?

1. The bridge.


The footing/base for the bridge can be seen.

Ready for installation.


In situ.

The bridge (a Rix products kit) was easy to assemble. The railings reminded me of the bridges in Glen Williams, where I grew up. I rusted the railings with burnt sienna paint and added (too much) grime on the surface.

As with many things on the layout, the challenge with the bridge is that it had to fit in with future projects - in this case, scenery blob #1 (the large blob at the back against the backdrop) and scenery blob #2 (in the foreground in the first picture). Here the pink insulation foam helped because you can make a precise cut in the foam for the bridge to fit in. 

I measured the fit countless time - both to bridge the blobs together and to ensure the clearance over the track was adequate.

Blob #2.


2. The curve.

The almost 90 degree curve vehicles encounter isn't very prototypical. In the 60's, with standard tractor trailer lengths being 28' to 34' (feet), I could see it being possible.

But here again, the art of distraction comes into play:

Hi visibility railings added by Aston county

Hiding the road.

I scratchbuild slightly over size warning railings to draw the eye and serve as an apology from the Aston county public works department for the sharp curve.

Here again the 3-D backdrop helps - the rock outcropping justifies the sharp curve.

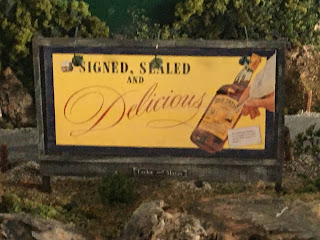
3. The billboard.

Beauty.

So:

1. I'm a lawyer - signed, sealed and delivered being a common (albeit archaic) phrase used in contracts.
2. I kept on humming the Dave Dudley tune "Six Days on the Road" in my head as I built the billboard.
3. I work in the transport business (and for a trucking company in the past) so I thought this would be an ad that appealed to that demographic. Bottles of scotch being a very common "thank you for your business" present to traffic managers back in the day.

The billboard is an easy-to-assemble kit (it took about 2-3 hours) from Blair Line. I painted and weathered it before installing it. The billboard illustrates many of the things that make the hobby rewarding. First of all, the MR industry has plenty of small Mom and Pop suppliers who make great kits just a click away. Second, the effort/reward here is considerable - the billboard adds a lot of visual interest and it only took a short time to build. And I like the colour (muted yellow) as it goes well with the warning railings. Three, the billboard, in a small way, takes you out of 2021 Toronto as you look at it, back to the 50's and 60's.

4. The disappearing act. 

As I mentioned at the top, a golden rule of scenery is to avoid 90 degree meets between foreground scenery (i.e. a road) and the backdrop. Of the oldest tricks in the MR book (literally - I saw this in a scenery book from the 1950's) is to have the road crest right before it hits the backdrop so the eye can't see the meet. The dip also avoided the problem having the road plaster mess up my picture backdrop. The road actually stops about 1/8 away from the backdrop.

Narrowing the road also gives the illusion of distance.

And I added a curve.

If I really wanted to be cool, I would have added N-scale guardrails (a smaller MR gauge than HO) to create "forced" perspective - that is changing size to fool the eye into believing something is further away than it actually is.


The finished scene.

The narrowing is very apparent.

In a future installment, we'll see where the road comes out. But next, I think we'll take a brief side trip.